Let us make your website as the demo!
Skip this documentation with our 24h installation service! Whether it's your own website or a client's, let us take care of it. The installation includes a full setup to make your website look just like our demo!
Installing WordPress
This is a Wordpress theme, so you must install Wordpress first. There are several ways to install WordPress but the easiest way would be to use one of the one-click autoinstallers available from you hosting company. Click here to learn how to install WordPress with the most popular autoinstallers, WordPress Toolkit, Cloudron, Fantastico, Installatron, and Softaculous.
Theme Installation
- Go to your WordPress Admin Panel & Log in (
wp-admin) - Go to Appearance/Themes/Add New
- From top, Click on Upload Theme
- Choose the theme ZIP file you've downloaded & Click Install Now
- Click on Activate to active the theme
License Key
- As soon as your theme is activated you will be prompted to enter the license key.
- On activation, you will notice a new menu in your WP dashboard, called Theme Setup which provides info about your Account, License Key settings and a short guide on what to do next.
- The Demo Importer will also become visible in Appearance section.
- You can activate as many WP local licenses as you need.
- You can white label the Account menu for a client's website.
Plugins Installation
A small notice about the recommended and required plugins will be visible in your WP Dashboard as soon as you activate the theme. Install and activate them before anything.Demo Importer
- Make sure all required plugins are installed and activated.
- Navigate to WordPress Dashboard/Appearance/Import Demo Data and proceed with the import. (Note: Unless you have your license key activated and the Demo importer plugin active, you will not be able to see the Demo Import section.)
- After successful message, wait for a few seconds, then you can visit the website. You may need to refresh if it takes too long for the first time.
- You may experience a slower page load soon after import, do not worry, it will all go back to normal in a couple of minutes.
After Import
You should now have a full website ready. All you have to do is change it with your actual content, images and options. In order to do this, please, navigate to:
- Dashboard/Pages (pages)
- Dashboard/Appearance/Customize (options)
- Dashboard/Posts (blog)
Menus
Before adding items to the menu, you must first define it.
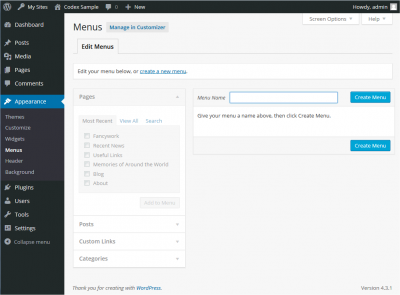
- Navigate to the WordPress Dashboard.
- From the ‘Appearance’, select the ‘Menus’ option.
- Choose Create a new menu at the top of the page
- Enter a random name in the Menu Name box
- Click the Create Menu button.
That’s it! You’ve just created a custom menu. Now let’s add some items to it!
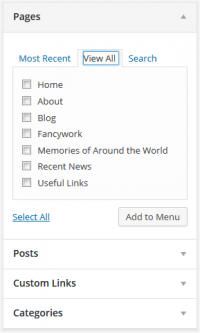
- Notice the pane entitled Pages.
- Within this pane, click the View All link to display a list of all the published Pages on your site.
- Choose the Pages that you want to add by clicking the checkbox.
- Click the Add to Menu button located at the bottom of this pane to add your selection(s) to the menu that you created in the previous step.
- Click the Save Menu button once you’ve added all the menu items you want.
Great! Now the final step, make the menu visible in site. Redxun theme supports 2 menus - header & footer.
- Scroll to the bottom of the menu editor window.
- In the section titled Theme locations, click the check box for the location where you want your menu to appear.
- Click Save menu once you’ve made your selection.
The menu should be now visible in website.
Customizer Presentation (Theme Options)
Mediumish uses the build in WordPress Customizer. Navigate to Appearance / Customize from your WordPress dashboard. You will be taken directly to the Customizer where you will be able to set all theme options, including the home layout:
Subscribe Bar

Navigate to Appearance/Customize/Mediumish Theme/Articles, scroll down and you will notice the area named: “Bottom Alert Bar”. This is where you will add the Mailchimp shortcode or any other announcement you might want to display to your readers.
To get your Mailchimp shortcode you must have this free plugin installed and active.
If you want to use a child theme, we recommend you to easily create a child theme with this Child Theme Configurator plugin.

If you'd rather create it manually, please, read our detailed article: “Protect Your WordPress Customizations with a Child Theme”.
Translate Theme
The theme is translatable. All you have to do is to install a specific plugin so you can easily translate the theme in your own language. We recommend you Loco Translate plugin.

Icons
The theme has Font Awesome integrated. This means you can use any icon from this list anywehere in your site with a simple code.
Images
You can get free images for your website at Unsplash.com.
White Label Option
Agencies and freelancers who work on client projects can hide confidential information about their account and license by flagging a license as White Labeled. Click here to learn more.
Get Support
This documentation is always evolving. If you have questions, please, submit a ticket here.


